
Thanks to lots of positive feedback and generous support from the Knight Foundation, what began more than a year ago as a very rough prototype of an interactive, data-driven web series has finally been refactored into the first components of a fully-fledged web platform that allows filmmakers, developers, journalists and storytellers of all kinds to create and share interactive videos online.
Although you’re welcome to go straight for the code, we wanted to highlight some of the major features that we think will be of interest if you’re curiou about making a Data Doc yourself:
A Basic “Data Doc”
At its most fundamental, a Data Doc simply combines HTML web video with overlays of dynamic, interactive text, images and graphics, showing and hiding them according to the video’s playback position. The core component of the platform is the datadoc object, which automatically generates customized (and customizable) video controls, in addition to providing optional fullscreen support and embed options. Overlaid elements can be hard-coded to the page inside any <div> element that has a unique id attribute. Alternatively, Javascript and common libraries (like jQuery) can be used to write content dynamically to the page. However your <div>s get there, though, you can use the built-in addSalt and addCaramel methods to tie their visibility to the video timeline at any point up until the video starts playing.
Ok, but what’s actually happening? To get a sense of this, it’s first helpful to understand how the pieces of a Data Doc webpage are organized. Below is a basic diagram:
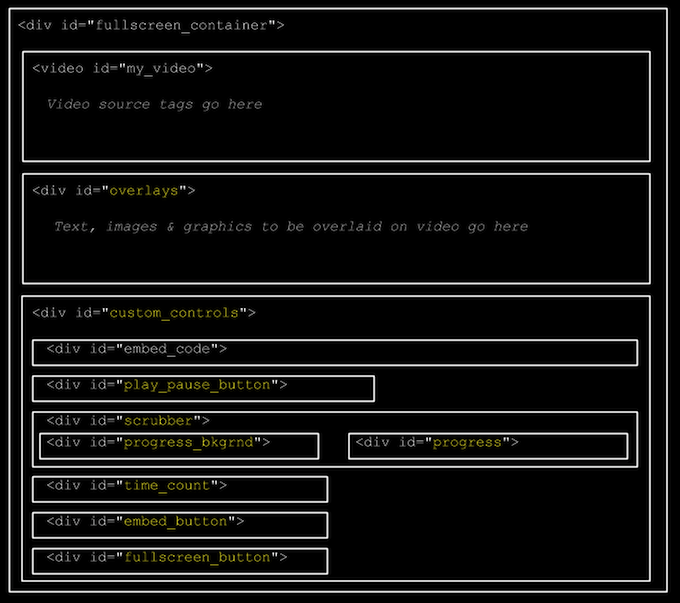
Or, looked at another way:

The Building Blocks
The “fullscreen” div
Wrapping all the other pieces that make up a Data Doc is the “fullscreen_container” div, which is the element that will expand when a user puts the video into fullscreen mode. It’s essential that all other divs (the video, overlays, controls &c.) live inside this div; otherwise, your overlays may get disconnected from your video or not scale properly, or you users might not be able to control playback in fullscreen mode.
Note that Data Docs scales your underlying video and overlays by a factor calculated from your original video dimensions and the size of the current screen, which means that small videos may appear pixellated if fullscreen is enabled. Because of this, fullscreen will only be available if you pass the name of this div to the Data Docs constructor, in which case, you must also include a div in your controls with an id of fullscreen_button.
The video div
Data Docs relies on the HTML5 video element for video rendering and control. In order to work properly across major browsers, you’ll need to make sure to include source types of both and ogv and webm, at least. You must specify the video size through an inline style attribute directly on the video div that matches the native dimensions of the video. You can set the default image that displays before the video is playing via the “poster” attribute. Finally, it is important that your video tag not include the “controls” attribute, as these will not interact properly with a standard Data Docs implementation. For example, a basic Data Doc video tag (taking the example from our current prototype) might look like this:
The “overlays” div
The overlays div is where the Data Doc will look for any element that is added to the timeline; note that the id of this div must be “overlays”. Whether hard-coded or added by scripting, this div is where any content that will appear in your Data Doc should live. This content can consist of any number of
A simple example
We expect that most people will want to use Data Docs to overlay dynamic text on their videos, so we’ve tried to make that particularly painless. Though our prototype uses an awesome custom-gif font (which you are also welcome to use) to render text, Data Docs also supports webfonts so you can make your Data Doc your own. To see how this works in action, take a look at our simple webfonts example. The code is broken down below.
index.html
For this example, we’ll just add a single piece of text to our Data Doc, by creating a div tag directly inside the the existing overlays div in our index.html. In our example, we’ve given that div an id of “my_text” and placed some “Really fantastic text” inside.
In order to make sure our new text is rendered in our webfont, we have to make sure to load the font at the top of the file. In our example, you can see we’ve loaded a font called “Tangerine” from Google’s webfonts directory near line 20.
main.js
To make sure our text only shows when we want it, though, we have to tell our Data Doc when our new text div should be visible over our video. We do this via the call to addSalt
you see in main.js. The start and end time are specified in seconds, and the id of our text div is passed in as well. You’ll notice that addSalt appears inside a standard jQuery document.ready() block; it’s important that any addSalt calls appear after the data_doc object is initialized, but still inside of document.ready().
css/main.css
In order to make sure our new text is actually rendered in our webfont, we have to make sure to style it inside our main.css file (inside the “css” folder). In addition to specifying our webfont in the font-family property, however, we also have to make sure indicate that our div should have position:absolute; and both its top and left properties specified (these will be calculated from the top left corner of the video). Not only does this give better control over where the text appears, it’s ensures that it is properly positioned when the video goes full screen.
And that’s it! All you need to do now is open the index.html file in a web browser (as long as it’s not Internet Explorer!) to see your video in action.
What’s next?
Well, chances are you’ll want to add more than one overlay to your Data Doc. You can do that by simply add more divs, more styles, and more calls to “addSalt” as we did above. At a certain point, however, that will get a bit tedious, which is why we created the “addLabels” method, which we’ll look at next.
Leave a Reply